
Assign a single transfer coordinator as the accountable owner, then execute five core actions in sequence: capture the referral, confirm clinical acceptance, prepare the transfer packet, verify payer authorization, and confirm transport logistics before departure. That sequence, applied consistently, is how to coordinate facility transfers without last-minute scrambles or documentation gaps.
Your minimal start-today checklist:
- Intake: capture demographics, diagnosis, insurance ID, and level-of-care needs in the EMR
- Acceptance: referring clinician contacts accepting physician; document verbal acceptance and follow with written confirmation
- Packet prep: assemble facesheet, medication list, active orders, advance directives, and infection status
- Authorization: verify payer eligibility and obtain or document pending prior authorization before transport is booked
- Transport confirmation: confirm vehicle type, staffing level, equipment, and estimated departure time
- Arrival close-out: receiving team confirms arrival in the EMR; sending facility documents completion
The single coordination owner is the transfer coordinator (or transfer center nurse in larger systems). Every escalation goes first to the on-duty charge nurse, then to the attending or accepting physician. Peer-reviewed evidence confirms that standardized checklists and structured handoffs measurably reduce communication errors during transfers.
Pro Tip: Lock three mandatory EMR fields at intake: insurance policy number, accepting physician name, and transport mode. Transfers that leave any of these blank are the ones that stall at the loading dock.
Table of Contents
- How to coordinate facility transfers: the full step-by-step checklist
- What clinical safety checks and EMTALA rules apply to every transfer?
- What belongs in the transfer packet, and how does EMR integration reduce risk?
- How do you verify payer and prior authorization before transport?
- How do you choose the right transport mode and confirm logistics?
- How do you confirm arrival and close the loop on a transfer?
- Which KPIs should you track to improve your transfer program?
- How does a multidisciplinary governance council improve transfer outcomes?
- Legal and regulatory compliance beyond EMTALA: HIPAA and state-specific transfer laws
- Key Takeaways
- Why structured transfers are worth every minute of setup time
- Smartadmissions cuts the manual work out of transfer coordination
- Authoritative sources, templates, and tools to implement this playbook
How to coordinate facility transfers: the full step-by-step checklist
A reproducible workflow gives every team member a shared script, regardless of shift or census pressure. The six steps below map directly to the start-today checklist above, with concrete deliverables and realistic timeline targets for each.
Step 1: Referral intake (target: complete within 30 minutes of referral receipt)
The referring facility or hospital case manager submits the referral. Your transfer coordinator captures:
- Patient demographics and primary diagnosis (ICD-10 code)
- Current level of care and anticipated receiving level of care
- Insurance carrier, policy number, and group number
- Referring physician name and direct callback number
- Reason for transfer and urgency classification (emergent, urgent, or routine)
- Known isolation or infection status (MRSA, C. diff, VRE, or active respiratory precautions)
Flag the EMR record immediately with urgency level and isolation status. Set an auto-reminder for the authorization deadline. For long-distance, non-emergency transfers, early transport provider involvement and a designated coordination owner are the two factors most likely to prevent delays.
Step 2: Clinical triage and acceptance (target: within 60 minutes for urgent cases)
The accepting physician or triage clinician reviews the clinical summary. Required actions:
- Document verbal acceptance with date, time, and accepting provider name
- Confirm the receiving facility has the appropriate bed type, staffing, and equipment
- Record any conditions of acceptance (e.g., “accept pending current labs”)
- Generate a written acceptance order in the EMR before transport is dispatched
The HIPXchange Transfer Call Toolkit recommends standardized transfer call scripts so that acceptance conversations capture the same data points every time, reducing back-and-forth calls.
Step 3: Prepare the transfer packet (target: complete before transport arrives)
The transfer packet is the single most common failure point. Assign packet assembly to the bedside nurse and transfer coordinator jointly, with the case manager supplying financial and authorization documents. Full packet contents are detailed in the dedicated section below.
Pro Tip: Print a packet cover sheet with a checkbox for every required document. The transport crew checks it at the door. Any missing item triggers a five-minute hold, not a departure and a callback.
Step 4: Insurance and authorization (target: initiated at intake, confirmed before departure)
Payer verification runs parallel to clinical triage, not after it. The admissions coordinator or financial counselor:
- Confirms active coverage and benefit limits
- Contacts the payer’s authorization line and documents the reference number
- Notes any known exclusions or prior authorization requirements for the receiving level of care
- Flags pending authorizations in the EMR so transport is not dispatched without a plan
Step 5: Transport confirmation (target: confirmed at least 2 hours before planned departure)
The transfer coordinator contacts the transport provider and confirms:
- Vehicle type and staffing level match the patient’s acuity
- Required equipment is on board (oxygen, infusion pump, stretcher restraints)
- Estimated departure and arrival times are communicated to the receiving facility
- A direct contact number for the transport crew is documented in the EMR
Step 6: Departure, en-route updates, and arrival close-out
At departure, the bedside nurse gives a structured verbal handoff to the transport crew. En route, the crew contacts the receiving facility if the patient’s condition changes. At arrival:
- Receiving nurse confirms patient arrival verbally and in the EMR
- Sending facility documents transfer completion with time stamp
- Any transport incidents are logged in an incident report within 24 hours
What clinical safety checks and EMTALA rules apply to every transfer?
Clinical readiness and legal compliance are not separate checklists. They overlap at the moment the transfer decision is made.
Clinical safety criteria before departure:
- Airway is patent or secured; respiratory status is stable for the planned transport duration
- Hemodynamic status is stable or the transport team has the equipment and skills to manage instability en route
- Active bleeding is controlled; pain is managed to a level compatible with safe transport
- Isolation precautions are in place and communicated to the transport crew
When clinical status is ambiguous, the EMS.gov Interfacility Patient Transfer guide is explicit: match provider skills and equipment to patient needs, and err on the side of higher-level stabilization rather than assuming lower-risk transport is adequate.
EMTALA baseline requirements for ED transfers:
The Emergency Medical Treatment and Labor Act (EMTALA) applies to any transfer originating from a Medicare-participating hospital’s emergency department. Under EMTALA, the sending facility must:
- Provide a medical screening examination and stabilize the patient within its capability before transfer
- Obtain written informed consent from the patient (or legal representative) for the transfer
- Confirm that the receiving facility has accepted the patient and has the capacity and capability to treat the condition
- Send all medical records, test results, and imaging available at the time of transfer
The Capacity Management legal and regulatory guide identifies documentation of stabilization and written acceptance as the two records most frequently scrutinized in EMTALA regulatory reviews.
HIPAA considerations:
Transmitting records during a transfer is a permitted disclosure under HIPAA’s treatment exception, but the method of transmission matters. Use secure fax, encrypted email, or a HIPAA-compliant health information exchange. Avoid unencrypted text messages or personal email. Document the transmission method and recipient in the EMR.
Pro Tip: When calling ahead to the receiving facility, use the ABCDE structured report format recommended by Mayo Clinic: Airway/Assessment, Breathing, Circulation, Disability (neuro), and Exposure/Everything else. Receiving teams process this format faster than a narrative summary, and it reduces follow-up calls.
What belongs in the transfer packet, and how does EMR integration reduce risk?
A complete transfer packet prevents the single most common arrival problem: a patient who arrives without orders, without a medication list, or without an isolation flag. Los Angeles County Public Health’s interfacility transfer guidance specifically requires that infection and colonization status appear on the transfer form, with care instructions for the receiving team.
Required packet contents
| Packet Category | Documents Included | Supplied By |
|---|---|---|
| Patient identification | Facesheet, photo ID copy, insurance card | Transfer coordinator |
| Clinical summary | Problem list, latest vitals, nursing notes (past 24 hours) | Bedside nurse |
| Medications | Current medication list with last administration times | Bedside nurse / pharmacist |
| Orders | Active physician orders, pending labs, diet orders | Referring clinician |
| Legal and directives | Advance directives, DNR/DNI status, power of attorney | Case manager / patient/family |
| Infection control | Isolation status, colonization flags, precaution instructions | Infection control / bedside nurse |
| Transport instructions | Equipment needs, escort requirements, positioning notes | Transfer coordinator |
| Financial | Insurance authorization, payer contact, prior auth reference | Admissions coordinator |
EMR integration and packet completeness
Discrete, required EMR fields reduce the risk of a packet leaving the building incomplete. Configure your EMR to flag transfers as “packet incomplete” when any mandatory field is blank. FHIR and HL7 standards allow structured data to move between systems without manual re-entry, which cuts transcription errors and speeds acceptance at the receiving facility. A step-by-step intake process that maps each packet item to a specific EMR field gives your team a repeatable build sequence.
Store a digital copy of the completed packet in the transfer encounter record. Time-stamp and version the packet at the moment of departure so the receiving team knows they have the final version, not a draft.
Pro Tip: Add a “packet version” field to your transfer encounter. If the packet is updated after the transport crew has already received a copy, the version number tells the receiving team to request the latest. This eliminates the “which medication list is current?” call.
How do you verify payer and prior authorization before transport?
Authorization failures are preventable. They happen when payer verification is treated as a post-transfer administrative task rather than a pre-departure clinical one.
Minimum payer data to capture at intake:
- Insurance carrier name and plan type (Medicare, Medicaid, commercial, managed care)
- Policy number and group number
- Authorization phone number and fax number
- Name of the authorization representative (document it)
- Known benefit exclusions for the receiving level of care (e.g., skilled nursing facility days remaining)
Payer verification should begin within 30 minutes of referral receipt, running in parallel with clinical triage. Target: authorization confirmed or a documented pending status before transport is dispatched.
Automated eligibility checks integrated into your EMR or referral management system shorten this timeline significantly. Real-time verification against payer portals eliminates the manual phone queue and surfaces benefit limits before the transfer is clinically committed. Healthcare workflow automation examples show how eligibility checks can be embedded directly into the intake workflow, triggering alerts when coverage is inactive or authorization is required.
Pro Tip: When authorization is pending at departure time, document the authorization reference number, the payer representative’s name, and the expected decision date in the EMR. Attach a note to the transfer packet so the receiving facility’s billing team has the same information. This prevents duplicate calls and protects both facilities from a retroactive denial.
How do you choose the right transport mode and confirm logistics?
Transport mode selection is a clinical decision, not a logistics preference. The wrong vehicle level is one of the most preventable causes of mid-transport deterioration.
Ground vs. air: decision criteria
- Patient stability: unstable patients requiring continuous monitoring or intervention generally need ALS (Advanced Life Support) ground transport or air transport with a flight nurse or paramedic
- Distance: for transfers under 150 miles with a stable patient, ground ALS is typically appropriate; beyond 150 miles or when time is critical, air transport warrants evaluation
- Specialized equipment: ventilator-dependent patients require a transport ventilator with confirmed compatibility; infusion pumps must be battery-capable for the full transport duration
- Weather and terrain: air transport is weather-dependent; have a ground backup confirmed before dispatching a helicopter
- Cost: air transport costs are substantially higher than ground; confirm payer coverage before booking, as many commercial plans require prior authorization for air transport
Staffing and escort requirements by acuity:
- BLS (Basic Life Support): stable patients with no active IV medications and no monitoring needs
- ALS (Advanced Life Support): patients with active IV drips, cardiac monitoring, or potential for deterioration
- Critical care transport: ventilator-dependent, hemodynamically unstable, or post-surgical patients requiring RN or physician escort
- Specialty escort: neonatal, psychiatric, or bariatric transfers may require specialty-trained personnel
The EMS.gov Interfacility Patient Transfer guide frames the governing principle clearly: match clinical needs to provider skills and equipment, and when the acuity level is ambiguous, choose the higher staffing level.
Equipment checklist before departure:
- Oxygen supply confirmed for transport duration plus 30-minute reserve
- Infusion pumps charged and programmed; medication bags labeled with rate and drug name
- Ventilator settings documented and confirmed compatible with transport unit
- Stretcher restraints checked; side rails secured
- Ordered supplies (wound care, suction, specialty positioning) packed and labeled
Contingency planning:
Confirm a direct contact number for the transport crew before departure. Establish an intercept protocol: if the patient deteriorates en route, the crew contacts the transfer coordinator and the nearest ED simultaneously. Document the intercept protocol in the transfer order.

Pro Tip: Pre-book your preferred transport provider for elective transfers 24–48 hours in advance and confirm a backup provider. Same-day transport requests during peak census periods frequently result in 3–4 hour delays that push departures past shift change.
How do you confirm arrival and close the loop on a transfer?
Arrival confirmation is the step most facilities handle informally, and that informality creates documentation gaps that surface during audits and readmission reviews.
Who confirms arrival and what counts as confirmation:
- The receiving nurse documents patient arrival in the EMR with a date and time stamp
- The sending facility receives a verbal or written confirmation from the receiving facility within 30 minutes of expected arrival
- Acceptable confirmation methods: signed acceptance note in the shared EMR, fax confirmation, or a documented phone call with the receiving nurse’s name and time
Structured verbal handoff at arrival:
- Identify the patient by name and date of birth
- State the reason for transfer and the accepting physician’s name
- Report current vital signs and any changes since departure
- Review the active medication list and last administration times
- Communicate isolation status and active precautions
- Hand over the physical transfer packet and confirm receipt
The Mayo Clinic trauma transfer guidance recommends calling ahead before arrival so the receiving team is positioned and ready, not scrambling when the patient rolls through the door.
Written handoff elements to attach to the receiving chart:
- Transfer summary note (diagnosis, reason for transfer, clinical status at departure)
- Medication reconciliation note
- Any transport incidents or changes in condition en route
- Contact information for the referring clinician for follow-up questions
Pro Tip: Configure your EMR to send an automated arrival-confirmation task to the transfer coordinator when the receiving facility documents the admission. This closes the loop without a manual callback and gives your KPI dashboard a clean, time-stamped data point.
Which KPIs should you track to improve your transfer program?
Measuring transfer performance turns a reactive process into a managed one. The metrics below give your team the data to identify bottlenecks, justify staffing decisions, and demonstrate quality improvement to payers and regulators.
Structured checklists and handoffs reduce communication errors during transfers, but measurement is what tells you whether your checklist is actually being followed consistently.
| Metric | How to Calculate | Measurement Frequency | Owner |
|---|---|---|---|
| Time-to-accept | Minutes from referral receipt to documented acceptance | Per transfer; weekly average | Transfer coordinator |
| Time-to-depart | Minutes from acceptance to patient departure | Per transfer; weekly average | Transfer coordinator |
| Arrival confirmation rate | % of transfers with documented arrival confirmation within 60 min | Weekly | Charge nurse / transfer coordinator |
| Packet-complete rate | % of transfers with all required packet fields completed at departure | Weekly | Transfer coordinator |
| Transfer-related readmission rate | % of transferred patients readmitted within 30 days | Monthly | Quality / case management |
| Acceptance-to-admission lag | Hours from acceptance to formal admission at receiving facility | Weekly | Admissions coordinator |
Dashboard and escalation structure:
Review time-to-accept and time-to-depart weekly at the transfer coordinator level. Escalate to governance review when packet-complete rate falls below 90% or when transfer-related readmissions spike above your baseline for two consecutive weeks. A monthly quality report to the multidisciplinary council keeps leadership aligned with frontline performance.
Pro Tip: Link your EMR’s transfer encounter events (referral received, acceptance documented, departure time, arrival confirmed) to your reporting module. Automated KPI capture eliminates manual spreadsheet entry and gives you real-time visibility rather than a monthly retrospective.
How does a multidisciplinary governance council improve transfer outcomes?
Top-down policy mandates rarely stick in transfer programs. Frontline staff find workarounds, checklists get abbreviated under census pressure, and compliance drifts. Multidisciplinary shared-governance councils work because the people who own the steps also own the rules.
Why shared governance outperforms directives:
A council that includes bedside nurses, transfer coordinators, case managers, physicians, and administrators surfaces the real friction points, not the ones visible from a conference room. When a bedside nurse proposes a packet checklist change because a specific field is consistently wrong, that change gets adopted because the person proposing it is also the person who will use it.
The HIPXchange Transfer Call Toolkit supports this model, recommending that transfer nurses be trained on tools and that accepting providers be educated on how those tools are used, creating shared fluency across the handoff.
Suggested council membership and cadence:
- Transfer coordinator (chair)
- Charge nurse representative (rotating)
- Case manager
- Accepting physician representative
- Admissions coordinator
- Quality and compliance officer
- IT/EMR analyst (for build requests)
Meet monthly for routine review; convene ad hoc within 48 hours of a sentinel transfer event. Decision rights: the council proposes checklist changes; the medical director and compliance officer approve them. Frontline staff may flag issues for the next meeting agenda without waiting for a supervisor.
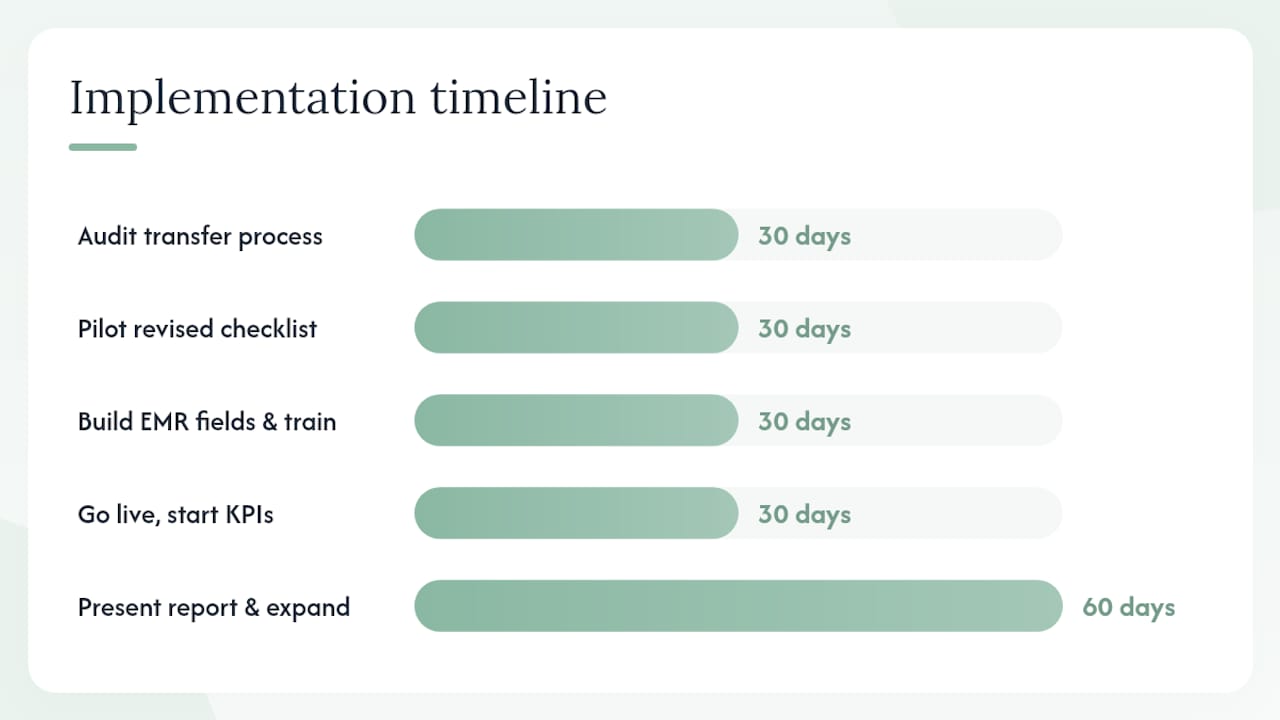
90-to-180-day implementation timeline:
- Days 1–30: audit current transfer process; map actual steps against the ideal checklist; identify the top three documentation gaps
- Days 31–60: pilot the revised checklist with one admitting unit and one referring partner; run two to three pilot cycles before expanding
- Days 61–90: build required EMR fields and packet completeness flags; train all transfer coordinators and charge nurses
- Days 91–120: go live with the full checklist; begin KPI tracking against baseline
- Days 121–180: present first quality report to the governance council; adjust checklist based on pilot findings; expand to all units
A small pilot using one unit and one referring partner consistently surfaces the most common documentation and timing gaps. Iterate the packet template and EMR flags across two to three pilots before enterprise rollout.
Pro Tip: Run a 15-minute debrief after each pilot transfer. Ask the transport crew, the bedside nurse, and the receiving facility contact one question each: what was missing, what was confusing, and what would you change? Three answers per transfer cycle is enough data to iterate quickly without analysis paralysis.
Legal and regulatory compliance beyond EMTALA: HIPAA and state-specific transfer laws
EMTALA sets the federal floor for emergency transfers, but your compliance obligations extend well beyond it.
HIPAA and secure record transmission:
Every document in the transfer packet contains protected health information (PHI). HIPAA’s Privacy Rule permits disclosure for treatment purposes, but the Security Rule governs how that disclosure happens. Secure fax, encrypted email, and HIPAA-compliant health information exchanges (HIEs) are acceptable. Standard SMS and personal email are not. Document the transmission method, recipient name, and time in the EMR for every transfer. Your patient data security practices for admissions workflows apply equally to transfer communications.
Written transfer agreements:
The CMS facility transfer agreement example outlines the responsibilities each facility assumes before, during, and after a transfer. A written agreement between your facility and your most frequent referring or receiving partners is not just good practice; CMS Conditions of Participation require critical access hospitals and certain other providers to maintain written transfer agreements. Review and update these agreements annually.
State-specific transfer laws:
State regulations vary significantly. Several states impose requirements beyond EMTALA, including mandatory transfer forms, specific consent language, or reporting obligations for certain patient populations (psychiatric, pediatric, or correctional). The Capacity Management legal and regulatory guide identifies state-level variation as a common compliance gap, particularly for facilities that receive transfers across state lines. Consult your state health department and legal counsel to confirm which state-specific rules apply to your transfer volume and patient mix.
The 5 best practices from The Hospitalist:
The Hospitalist’s interhospital transfer best practices include a dedicated triage clinician role, EMTALA checkpoints at intake, and a transfer-back workflow that accounts for interfacility agreements and financial considerations. Embedding these into your governance council’s standing agenda keeps compliance current as regulations evolve.
This article provides general operational and compliance information. Confirm current federal and state requirements with your legal counsel, compliance officer, or the relevant regulatory authority before implementing changes to your transfer program.
Key Takeaways
Safe, efficient facility transfers require a single accountable owner, a complete transfer packet, verified payer authorization, and documented arrival confirmation at every step.
| Point | Details |
|---|---|
| Assign one coordination owner | The transfer coordinator holds accountability for every step from intake to arrival close-out. |
| Standardize the transfer packet | Include facesheet, medication list, active orders, advance directives, and infection status on every transfer. |
| Integrate EMR flags | Mandatory fields and packet-completeness alerts prevent departures with missing documentation. |
| Verify payer before transport | Initiate authorization at intake; document reference numbers and pending status before dispatching transport. |
| Track KPIs weekly | Monitor time-to-accept, time-to-depart, packet-complete rate, and arrival confirmation rate to identify bottlenecks. |
| Use Smartadmissions for intake automation | Smartadmissions automates eligibility checks, EMR integration, and packet completeness validation to reduce manual work at every transfer step. |
Why structured transfers are worth every minute of setup time
The case for a formal transfer playbook is not theoretical. Facilities that treat transfer coordination as an informal, experience-dependent process consistently face the same failure modes: packets that leave without advance directives, transport crews that arrive without explicit care instructions, and receiving teams that call back because the medication list is three days old.
What gets overlooked in most discussions of facility transfer planning is the cost of the informal system. Every callback, every delayed departure, every readmission traced to a handoff gap represents staff time, payer scrutiny, and, most directly, a patient who did not get to the right level of care on time. The checklist is not bureaucracy. It is the minimum structure needed to make a complex, multi-party handoff repeatable.
The governance council model matters for a specific reason: it gives frontline staff a legitimate path to fix the checklist when it breaks down, rather than working around it. That distinction separates facilities with 95% packet-complete rates from those stuck at 70%.
Smartadmissions cuts the manual work out of transfer coordination
Faster bed occupancy and fewer authorization callbacks are the concrete payoff when your intake and transfer workflow runs on automation rather than phone queues and spreadsheets. Smartadmissions is built specifically for skilled nursing facilities, rehabilitation centers, and post-acute care providers that need to move faster on referrals without adding headcount.

The platform’s AI-powered referral management assistant integrates with your existing EMR via FHIR and HL7 standards, pulling real-time insurance eligibility data and surfacing packet completeness gaps before transport is dispatched. Authorization checks run automatically against payer portals, so your admissions coordinator gets an alert rather than a hold queue. The KPI dashboard tracks time-to-accept, packet-complete rate, and arrival confirmation rate in real time, giving your governance council the data it needs without a manual export.
When evaluating referral and transfer software, look for: direct EMR integration (not a manual upload), real-time eligibility verification, configurable packet-completeness rules, and a reporting module that maps to your existing KPIs. Smartadmissions covers all four. Explore referral management to see how automation reduces intake delays, or review the top referral management tools comparison to understand where Smartadmissions fits in your evaluation. Start a free trial at smartadmissions.ai to see the platform against your current workflow.
Authoritative sources, templates, and tools to implement this playbook
The resources below are the primary references for the guidance in this article. Use them to build your packet templates, train your transfer coordinators, and validate your compliance posture.
Primary sources and toolkits:
- Interfacility Patient Transfer guide (EMS.gov)
- Facility transfer agreement example (CMS)
- Transferring patients for best outcomes (Mayo Clinic)
- Peer-reviewed study supporting structured handoffs (PMC)
- Transfer Call Toolkit (HIPXchange)
- 5 Best Practices and Resources for Interhospital Transfers (The Hospitalist)
- Legal and regulatory considerations for facility-to-facility transfers (Capacity Management)
Template downloads to build:
For a deeper look at healthcare workflow optimization and how shared-governance approaches support transfer programs, the Smartadmissions resource library covers both the operational and technology sides of the process.