
The most reliable insurance portal workflow guide for SNF and rehab admissions runs five steps: verify member eligibility, search for an existing authorization, gather required identifiers and clinical fields, submit the admission or prior authorization through the payer portal, then save the authorization number and notify the plan within the payer’s SLA. Platforms like Smartadmissions, payer portals such as the UnitedHealthcare Provider Portal, and the Noridian Medicare Portal (NMP) each sit at a different point in that sequence. Run all five steps in order before therapy orders begin.
Key Takeaways
A reliable SNF portal workflow requires five steps executed in order: verify eligibility, search existing authorizations, prepare all identifiers and clinical fields, submit through the correct payer portal, and save the authorization number with a timestamped record.
| Point | Details |
|---|---|
| Verify eligibility first | Confirm MBI, legal name, DOB, and plan type before opening any portal submission screen. |
| Search before you submit | Check “Authorizations & Notifications” for existing auths to prevent duplicate records. |
| Enter facility NPI first | Most portals require the facility servicing provider NPI before any other provider field. |
| Save the auth number immediately | Record it in the resident file and admissions tracker; print the portal response page as a PDF. |
| Smartadmissions automates key steps | Real-time eligibility checks, auto-populated IDs, and auth polling reduce manual entry and denial risk. |
Table of Contents
- What should you gather before logging into a payer portal?
- How do you submit an admission or prior auth step by step?
- How do payer portals differ on submission routes and cutoffs?
- What happens after you submit? Post-admission notifications and clinical reviews
- Which clinical documents must you attach, and how should you format them?
- How do you fix member-not-found, plan mismatch, and duplicate auth errors?
- Where does automation give your team the biggest return?
- How do you document portal submissions for audits and protect PHI?
- Which payer portals and state rules should your team know?
- Ready-to-use scripts and templates for your admissions team
- The part of portal workflows most teams get wrong
- Smartadmissions cuts the manual steps out of your portal workflow
- Sources
What should you gather before logging into a payer portal?
Wasted portal time almost always traces back to missing data at login. Collect everything below before your team opens a single browser tab.
| Item | Why it matters | Where to find it |
|---|---|---|
| Member ID / MBI | Required for eligibility lookup and auth submission | Insurance card or EMR face sheet |
| Full legal name (as on card) | Exact match required; mismatch causes “member not found” | Insurance card |
| Date of birth | Secondary identifier for eligibility queries | Admission paperwork |
| Plan type and group number | Determines which portal and auth pathway to use | Insurance card / payer website |
| Facility NPI | Identifies your organization in the portal | NPPES registry |
| Servicing provider NPI | Entered first in most portals per payer rules | Credentialing file |
| Primary diagnosis code (with decimal) | Required field; portals accept up to 12 diagnoses | Physician orders / EMR |
| Level of service, admission source, patient status | Clinical fields required for auth submission | Referral packet |
| Proposed start and end dates, units/days | Defines the authorized stay length | Care plan / physician orders |
The Point32Health SNF Quick Reference Guide confirms that diagnosis codes must include the decimal point when the code requires one, and that portals provide SMART/Advanced Search options to locate codes by keyword. Use those search tools rather than typing codes from memory.
Pro Tip: Copy the MBI directly from the EMR face sheet rather than retyping it. A single transposed digit triggers a “member not found” error that can delay admission by hours. For a full patient eligibility checklist, Smartadmissions publishes a 10-step SNF-specific guide.
How do you submit an admission or prior auth step by step?
Follow this sequence every time, regardless of which payer portal you are using.
- Verify eligibility. Enter the MBI (or member ID), full legal name, and DOB. Confirm active coverage, plan type, and any coordination-of-benefits (COB) flags before proceeding.
- Select the member. Open the member record and navigate to the Patient Management or Authorizations section.
- Search existing authorizations. Use the “Search Requests” or “Authorizations & Notifications” area to confirm no duplicate auth exists for the same admission dates.
- Enter the admission or prior auth. Enter the facility servicing provider NPI first, then add diagnosis codes (up to 12, with decimals), level of service, admission source, patient status, and proposed start/end dates.
- Attach clinical documentation. Upload physician orders, therapy evaluations, and relevant progress notes before submitting. Keep files under the portal’s attachment limit (45 MB in some portals).
- Submit and capture the response. Note the status returned: Pended, Approved, or Denied. Record the authorization number immediately.
- Print or save the response page and notify your team. Log the auth number in the facility tracker and alert clinical staff to begin the care plan.
Take screenshots at steps 3, 6, and 7 — the member search screen, the authorization results screen, and the response box showing the status and auth number. These three images resolve most payer disputes without a phone call.
Pro Tip: Enter the facility servicing provider NPI before any other provider field. Point32Health’s portal guide explicitly requires this order, and most other portals follow the same convention. Getting it wrong can cause the submission to reject silently.
How do payer portals differ on submission routes and cutoffs?
Not every payer accepts portal submissions for every plan type. Know your route before you start.
- UnitedHealthcare Provider Portal (UHCprovider.com/PAAN): Standard submission route for UHC Medicare Advantage and commercial SNF prior authorizations.
- Access/NaviHealth portal (access.navihealth.com): Used for UHC MA and D-SNP members managed through Home and Community Care Transitions.
- Availity: Accepted by multiple regional and national payers; confirm which plans your contracted payers route through Availity before submitting.
- Phone/fax fallback: Available when portals are down or when a plan type does not support online submission. Always document the call reference number.
- State portals (e.g., TMHP for Texas): Required for Medicaid managed care notifications and state-mandated forms.
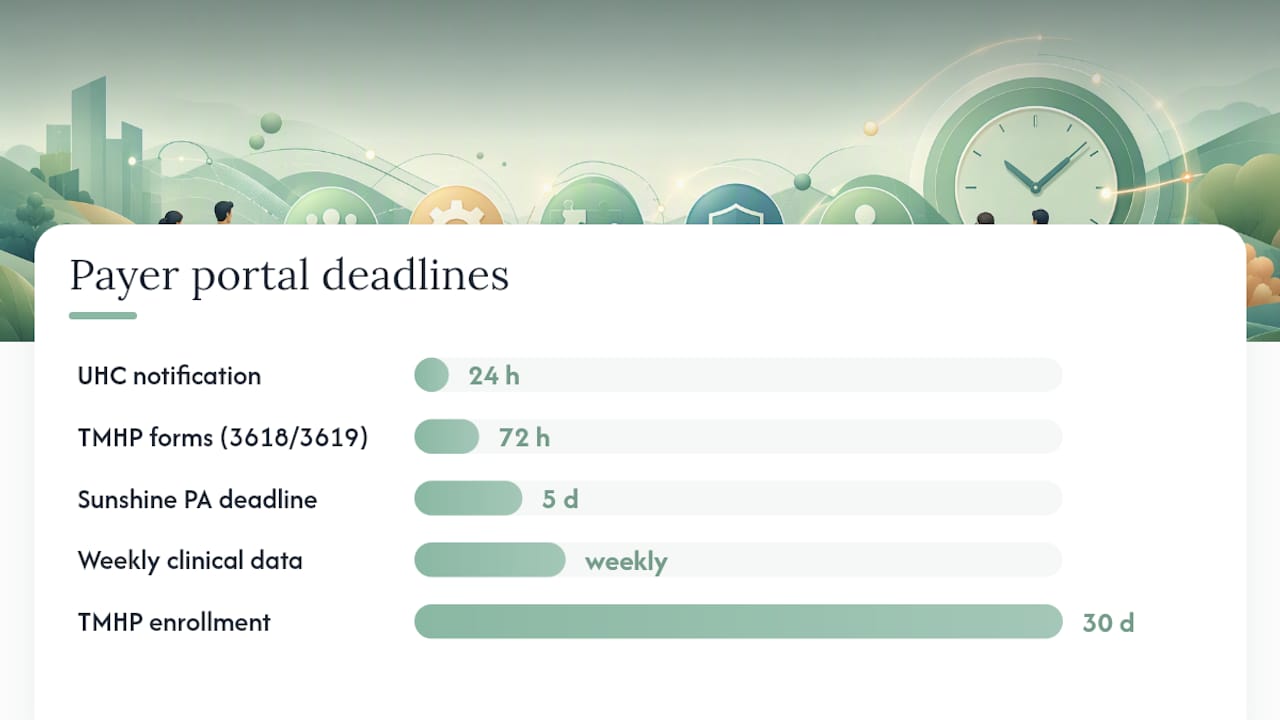
Timeline rules matter. UnitedHealthcare requires notification within 24 hours of admission or by 5 p.m. local time the next business day, depending on the plan. Missing that window can trigger a denial even when the clinical case is solid.
One critical point your team should internalize: an authorization confirmation number returned by the portal is not a guarantee of payment. UHC explicitly states that a nurse or medical director will conduct a clinical review before a final coverage determination is made.
What happens after you submit? Post-admission notifications and clinical reviews
Submission is not the finish line. Several payers require ongoing communication while the resident is in your facility.
- Notify the plan within 24 hours of admission, or by 5 p.m. the next business day, depending on payer rules.
- For UHC MA members, log the admission notification in the UHC Prior Authorization and Notification (PAAN) tool or in Access/NaviHealth, and save the case comment with the date and user who submitted.
- Sunshine Health requires PA requests for LTC/SNF members within five calendar days of admission; authorizations are valid for 12 months and tied to member eligibility and placement.
- Submit initial clinical evaluations promptly after admission. Some plans require a third-day submission for Medicare Advantage clinical reviews.
- Build a weekly upload rhythm for the first 14 days: progress notes, therapy updates, and any change-in-condition documentation.
Pro Tip: Set a calendar reminder for day 3 and day 7 post-admission. Missing a clinical review submission window is one of the most common causes of mid-stay denials, and it is entirely preventable with a simple recurring task.
Which clinical documents must you attach, and how should you format them?
Attaching the wrong files, or attaching them incorrectly, is the second most common reason portal submissions stall.
Required documents for most SNF/rehab prior authorizations:
- Physician orders (signed, dated)
- Initial PT, OT, and ST therapy evaluations
- Progress notes covering the proposed stay period
- Proposed length of stay and discharge plan
- Lab results and wound assessments where clinically relevant
File formatting rules:
- PDF is the preferred format across all major payer portals.
- Stay under 45 MB per attachment (the limit confirmed in the Point32Health portal guide).
- Scan multi-page packets as a single PDF rather than uploading individual pages.
- Use a consistent naming convention: MMDDYY_LastName_DocumentType (example: 062526_Smith_PhysicianOrders.pdf).
- Every clinical note must include the date of service, the author’s name, and a contact number.
Pro Tip: Never attach more files than the portal explicitly allows. Exceeding the attachment count can cause the entire submission to error out without a clear message. When in doubt, combine documents into one PDF and label it clearly.
How do you fix member-not-found, plan mismatch, and duplicate auth errors?
Portal errors block admissions. Work through them in this order.
- Member not found: Confirm the MBI against the Medicare card (not the EMR face sheet, which may be outdated). Check DOB formatting — some portals require MM/DD/YYYY, others MMDDYYYY. Verify the legal name matches the card exactly, including hyphens and suffixes. The Noridian Medicare Portal guide confirms that HETS is the authoritative eligibility source; use the current MBI, not a legacy HIC number.
- Plan mismatch: Confirm the plan type on the insurance card against what is loaded in the portal. Check for a COB situation where Medicare is secondary to a commercial plan.
- Duplicate authorization: Run a “Search Requests” query for the member and admission date range before submitting. If a duplicate exists, contact the payer to void or link the records.
- COB conflicts: Verify primary and secondary payer order with the member or the payer’s COB department before submitting.
- UHC Provider Portal: use the chat function within UHCprovider.com for real-time support.
- Noridian: contact the Noridian provider support line listed on med.noridianmedicare.com.
- Availity: use the Availity Help Center at availity.com for portal-specific troubleshooting.
Save a screenshot of every error message and the search parameters you used. That documentation is what payer support needs to resolve the issue quickly.
Where does automation give your team the biggest return?
Manual eligibility checks and portal data entry are the two highest-volume, most error-prone tasks in the admissions workflow. Automating them produces the largest time savings.
- Real-time eligibility verification: Auto-query the payer at the point of referral, before the bed is offered.
- Auto-populate member and provider IDs: Pull MBI, facility NPI, and servicing provider NPI directly from the EMR into portal fields, eliminating retyping.
- Prior auth status polling: Automatically check auth status at defined intervals and push updates to the admissions tracker.
- Auto-save auth numbers: Write the returned authorization number back to the resident record without manual transcription.
Implementation checklist for EMR/portal integration:
- Map every required portal field to its EMR source field before go-live.
- Test MBI and NPI formatting against each payer’s exact requirements.
- Define a manual override path for cases where auto-population fails.
- Enable audit logging so every automated transaction is traceable.
Facilities that automate eligibility checks and EMR-to-portal field mapping report faster bed occupancy and fewer data-entry denials. For a deeper look at what EMR integration delivers operationally, Smartadmissions covers the five core benefits on its site.
Pro Tip: Start automation with eligibility verification first — it is the step that occurs most frequently and has the clearest ROI. Auth polling and auto-save can follow once the eligibility integration is stable.
How do you document portal submissions for audits and protect PHI?
Every portal interaction should leave a paper trail that survives an audit.
Audit checklist:
- Save the authorization number in the resident record and the admissions tracker immediately after submission.
- Print or export the portal response page as a PDF and store it in the resident’s file.
- Record the date, time, and the name of the staff member who submitted.
- Retain authorization records for the period required by your state and payer contracts (typically a minimum of seven years for Medicare-related records).
Security and PHI handling:
- Assign role-based portal access — staff should access only the member records relevant to their role.
- Never share portal login credentials between staff members.
- Store exported PDFs containing PHI on encrypted, access-controlled drives per your facility’s HIPAA policies.
- Log out of payer portals after each session, especially on shared workstations.
Pro Tip: Create a dedicated folder in your document management system for portal response PDFs, organized by admission month. Auditors and payer support teams both ask for these documents first — having them indexed by date cuts retrieval time significantly.
Which payer portals and state rules should your team know?
Payer-specific rules change the workflow in ways that a generic checklist cannot anticipate.
- UnitedHealthcare Provider Portal (UHCprovider.com): Primary route for UHC MA and commercial SNF prior authorizations. Notification required within 24 hours or by 5 p.m. next business day.
- Access/NaviHealth (access.navihealth.com): Used for UHC MA and D-SNP members under Home and Community Care Transitions management. Log case comments here for clinical review tracking.
- Noridian Medicare Portal (NMP): Eligibility lookups for traditional Medicare. Enter the beneficiary’s name and MBI exactly as they appear on the Medicare card; HETS is the authoritative data source.
- Availity: Multi-payer portal used by regional and national plans. Confirm which of your contracted payers route through Availity before building a workflow around it.
- TMHP (Texas Medicaid and Healthcare Partnership): Required for Texas Medicaid managed care. UHC Community Plan of Texas requires resident transaction notices (Forms 3618/3619) submitted to TMHP within 72 hours of admission or discharge, and MCO enrollment verification at least every 30 days.
- Sunshine Health: PA requests for LTC/SNF members must be submitted within five calendar days of admission.
An authorization number from any of these portals is not a payment guarantee. Clinical review follows submission on most MA plans, and some require weekly clinical data while the resident is inpatient.
Ready-to-use scripts and templates for your admissions team
Eligibility check phone/chat script
Prior auth portal cover note
Attached: physician orders, PT/OT/ST initial evaluations, progress notes, proposed discharge plan. Member: [Full Legal Name], DOB: [DOB], MBI: [MBI]. Facility NPI: [NPI]. Servicing Provider NPI: [NPI]. Proposed admission: [Start Date] through [End Date]. Level of service: [SNF/Rehab]. Primary diagnosis: [ICD-10 with decimal]. Please contact [Name] at [Phone] with questions.
Portal case comment template (Access/NaviHealth or UHC PAAN)
Admission notification submitted [Date] at [Time] by [Staff Name]. Auth number: [Auth#]. Clinical documentation attached. Next clinical review due: [Date]. Assigned to: [Clinical Staff Name].
Filename examples:
- 062526_Smith_PhysicianOrders.pdf
- 062526_Smith_PTEval.pdf
- 062526_Smith_ProgressNotes.pdf
Once the auth number is received, assign the clinical review follow-up task to the appropriate clinical staff member in your facility tracker before closing the admission record.
The part of portal workflows most teams get wrong
Most admissions teams treat the authorization number as the end of the workflow. It is not. The auth number opens a clinical review process, and the outcome of that review determines payment. Facilities that build a post-submission clinical documentation rhythm — initial evals on day one, progress notes by day three, weekly updates through day fourteen — consistently see fewer mid-stay denials than those that submit once and wait.
The second pattern worth calling out: teams that skip the “search existing authorizations” step before submitting create duplicate auth records that take weeks to untangle with payer support. Running a 30-second search before every new submission is the single highest-return habit in the entire portal workflow.
Portal interfaces change. Payer rules update. The workflow itself, though, is stable: verify, search, prepare, submit, document. Build that sequence into your shift handoff card and it holds regardless of which portal you open.
Smartadmissions cuts the manual steps out of your portal workflow
Admissions coordinators who manage five or more payer portals daily know the cost of manual data entry: wrong MBIs, missed auth deadlines, and auth numbers that never make it into the resident record. Smartadmissions addresses each of those failure points directly.
The platform runs real-time eligibility verification at the point of referral, auto-populates member and provider identifiers into portal submission fields, polls auth status automatically, and writes the returned authorization number back to the resident record without manual transcription. EMR integration means your team is not rekeying data that already exists in the system. For facilities evaluating the manual vs. automated admissions decision, the operational difference is measurable from the first week.
Request a demo at Smartadmissions to see how the platform maps to your current payer portal workflow and where it can reduce your team’s daily manual workload.
Sources
Keep these portals and guides accessible for your admissions team.
- Skilled nursing facility prior authorization – UnitedHealthcare Medicare Advantage and Commercial Plans
- Skilled Nursing Facility Inpatient Admission – Quick Reference Guide
- Eligibility – Portal Guide – Noridian
- Long-Term Care (LTC) Skilled Nursing Facility Quick Reference Guide | Sunshine Health
Always save the portal response page before closing the browser. That page is your primary evidence in any denial dispute — and most portals do not allow you to retrieve it after the session ends.